
6d. ADDING GRAPHICS: Image Options
and Images and Links
Image Alignment
Options:
- If an image is displayed by itself on a line, you can use the
Align Left, Align Center, and Align Right tools (
 )
)
- If text will be displayed with an image, however, it is best
to:
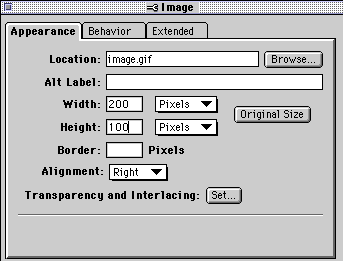
- Double click on the image in Claris HomePage.
- Select the Alignment option desired from the pop-up menu
(shown at right.)
- These options indicate where text will be displayed
relative to the image (top, middle, bottom) or where the image
will be displayed on the page (left, right).
- Select left or right if you want text to "wrap" around an
image. The image to the right is displayed with "Right"
alignment.
- Alternate
Labels: Type a title in the "Alt Label" blank which
will be displayed as the image loads in Netscape browsers, or when
the mouse passes over the image in Explorer browsers.
- Borders:
Eliminate the blue border which shows up around a linked image
(like this
 )
by setting a border width of 0 pixels (zero).
- Transparency and
Interlacing: By clicking on this button, you can
specify ONE color of an image which will be transparent (see
through). You can also interlace images from the same window,
which makes images load by gradually with increasing
resolution.
- Creating graphics for your
webpage: An option to finding graphics on the internet
or CD ROMs is creating them yourself.
- You can use "Paint" documents in ClarisWorks as well as
HyperStudio to create and manipulate graphics files.
- Use graphics to organize and unify your school webpage
- Create a primary school banner, and a smaller version to
use as a "return icon" to return visitors to the main
page
- Create a graphic for each subcategory of your webpage,
and use them in the same way.
- Most webpage images are "gif" files. If you create a
graphic in PICT format, you will need to convert it to GIF
format before including it on a webpage.
Helpful software includes:
- MAC/WINDOWS: Adobe
Photoshop is the premier image editing program available
today. Educational discounts are available
(http://www.adobe.com/prodindex/photoshop/main.html)
- MAC: "GraphicConverter"
is an excellent shareware utility designed for this purpose.
(http://www.lemkesoft.de/us_gcabout.html)
- WINDOWS: PaintShop
Pro is a highly-touted PC graphic program.
(http://www.jasc.com/psp.html)
- Remember to keep image sizes small (< 40K) to minimize
download time for visitors.
Make an Image a
Link: Just like text, an image can serve as a "link" to
another webpage:
- Click once on the image.
- Click on the Link Editor (
 )
)
- Type in the complete internet address of the resource you
want to link to, or click on the "Browse Files..." button to
create "relative links" to other pages you've
created.


"Good"
Webpages/Terms - Your
First Webpage - Authoring
Concepts/Design - HTML
Tagging
Formatting
Text - Adding Graphics - Uploading
- Advanced
Techniques - HOME

 Course
and Website by Wesley A.
Fryer of Lubbock, Texas.
Site sponsored by WesTech Vision
Inc.

![]()

![]()


 Course
and Website by Wesley A.
Fryer of Lubbock, Texas.