

FORMATTING TEXT
ON A HOTLIST
Once you have designed your website and created a storyboard, you
are ready to begin formatting text on the pages in a variety of
ways.
- WYSIWYG = What You See is
What You Get
- There are a variety of WYSIWYG webpage editors. These
software programs enable you to easily create webpages without
a great deal of technical expertise.
- I personally recommend Claris
HomePage. A full-blown, 30 day
demo is available so you can see for yourself what a simple
interface it has. The demo version of Claris HomePage is
fully functional: you can save and publish the pages you
create. I created the webpages for this inservice outline
with Claris HomePage. Demo versions for both Macintosh and
Windows computers are included on the Educator
Internet Tools 1.0 CD, available for around $10.
- Adobe
Pagemill and Microsoft's
FrontPage are other WYSISWG webpage editors. (The demo
version of Pagemill for Macintosh is NOT fully
functional: you can create webpages, but you cannot
save or publish them. The Windows demo is a 15 day
trial.)
- Basic Formatting Techniques
with Claris HomePage
- If you have not already, complete the steps described under
"Your First Webpage" contained
in this Inservice outline.
- Make a Link:
Any text on a webpage can serve as a "link" to another webpage
or a specific part of a webpage (called an anchor) To make a
link:
- Highlight the text you want to link.
- Click on the Link Editor (
 )
)
- Type in the complete internet address of the resource
you want to link to, or click on the "Browse Files..."
button to create "relative links" to other pages you've
created.
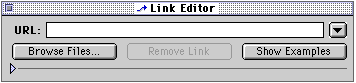
- That's it!
- Paragraph
Break: Start a new paragraph by hitting
RETURN in Claris HomePage. A space will be created after
a paragraph break.
- Line Break:
If you don't want a space between lines, you need to create a
line break. Do this by selecting the INSERT menu at the
top of the screen, and then LINE BREAK at the
bottom.
- Horizontal
Rule: Divide sections of your webpage by inserting a
horizontal rule. The INSERT HORIZONTAL RULE button is to the
right of the Insert Image button, and looks like
this:
 .
.
- Align Text:
Align text to the left, center, or right by choosing one of the
alignment buttons:
 In this case left alignment is selected, because that button is
shaded to indicate has been "pressed."
In this case left alignment is selected, because that button is
shaded to indicate has been "pressed."
- Text Styles:
Change text color or make text bold, italic, or teletype with
the buttons in the lower right corner:
 .
You must first highlight the text you want to format,
and then select the format you desire.
.
You must first highlight the text you want to format,
and then select the format you desire.
- "Heading" Text and
Lists: You can specify the size of text by making it
a "Heading." "Heading 1" is the largest heading, and "Heading
6" is the smallest. Here are examples:
Heading 1
Heading 2
Heading 3
Heading 4
Heading 5
Heading 6
- As always when formatting text, first highlight the text
you want to format.
- Then either select the FORMAT menu from the top
of the screen and the appropriate heading number, or choose
a setting from the pop-up menu in the upper left
corner:
 .
.
- You can make text a numbered or bulleted list the same
way. Choose the "Indent" or "Outdent" buttons (
 )as appropriate to move text in a list left or right.
- The text you are reading right now is an unordered
list. An ordered list uses numbers instead of
bullets for list items. You can alternatively use the
ordered/unordered list buttons:
 .
.
- Change Font
Size: Use the "Smaller Text" and "Larger Text"
buttons (
 )to change the relative size of text incrementally. The actual
size of text on a web browser is based on the preference
settings of that browser. The title following each bullet of
this list was increased with this method.
)to change the relative size of text incrementally. The actual
size of text on a web browser is based on the preference
settings of that browser. The title following each bullet of
this list was increased with this method.
- Document
Options: Select "Document Options" button
(
 )to
define the title of your webpage which will be displayed in the
top of the browser window, change the default colors for your
page, and use advanced HTML features.
)to
define the title of your webpage which will be displayed in the
top of the browser window, change the default colors for your
page, and use advanced HTML features.
- Email Link:
It is easy to make a link which will automatically open an
empty mail message window in a visitor's browser. The link will
automatically fill your email address in the "TO" field.
- Highlight the text you want to make an email link. Then
use the "Link Editor" button (),
but instead of entering a web address as the URL, type
mailto:user@host.com
- Type your email address instead of "user@host.com" as
used in this example.
- Here is another example: Email wfryer@tenet.edu
with your questions!

"Good"
Webpages/Terms - Your
First Webpage - Authoring
Concepts/Design - HTML
Tagging
Formatting Text - Adding
Graphics - Uploading
- Advanced
Techniques - HOME

 Course
and Website by Wesley A.
Fryer of Lubbock, Texas.
Course
and Website by Wesley A.
Fryer of Lubbock, Texas.
Site sponsored by WesTech Vision
Inc.