

ADDING
GRAPHICS
Quick
Reference
Key Concepts for Web Graphics
- Graphics are saved SEPARATELY from text files.
- Unlike desktop publishing software that allow users to control
the exact position of graphics and text, webpages allow less
exact, more limited control over position.
- Two main kinds of web graphics:
- GIF file: small size, limited to 256 colors, can be
animated
- JPG or JPEG file: usually larger, can contain millions of
color, can be "compressed" at varying levels
- Save graphics in the SAME FOLDER as HTML text files (or in an
images folder).
Handout help: See pages 3 and 4 of Miguel Guhlin's Getting
Graphics and Text off the Web (pdf format)
Color Limitations
Although your computer monitor can display 256, thousands, or
millions of colors, there are only 216 colors in common between the
256 colors usually displayed by web browsers on Macintosh and Windows
computer monitors. Use the "Netscape
216 palette" (http://www.homepage.co.uk/webcolour/) when choosing
colors for your webpages to ensure that users viewing 256 colors can
see your page contents properly.
Using Images from the Internet
or CD-ROM
There are an unbelievable number of "public
domain" graphics available on the internet. Many graphics are
protected by copyright, however, and cannot be legally copied and
used. To be on the safe side, make sure you verify the "public
domain" status of graphics before posting them on your
webpage.
Obtain graphics from the
internet
Save the Image File Directly:
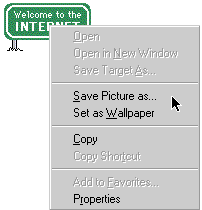
- Move the mouse on top of the image you want to save.
 Right
click on top of the image and choose "Save Picture As..."
(Within Internet Explorer on a Windows computer shown here).
 Re
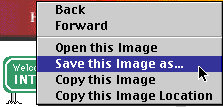
Re Click on top of the image and hold down the mouse button. A pop-up
menu will appear. Select "Save this Image As..." (Within
Netscape on a Mac shown here)
- You will then be prompted with a normal file saving window in
which you can specify the disk and folder onto which you want to
save the image.
- SAVE THE IMAGE IN A NEW FOLDER CALLED "IMAGES" WITHIN YOUR
HTML FOLDER.
Once you have saved an image file onto your computer and want to
insert it into a webpage.
Insert a Saved
Image
|
|
Claris Homepage
|
Netscape Composer
|
MS Frontpage 2000
|
- Click on the INSERT IMAGE button (It has a red
circle, green triangle, and blue square on it:
 .) .)
- Find the name of the image you want to put on your
webpage and click OPEN.
- It will be displayed in Claris Homepage like it will
be displayed in a web browser, unless it is an "animated
GIF" image. Homepage will just display the first "frame"
of an animated image. Preview in your browser to see the
animation.
|
|
- Click on the INSERT IMAGE button:

- Find the name of the image you want to put on your
webpage and click OPEN.
- It will be displayed in Claris Homepage like it will
be displayed in a web browser, unless it is an "animated
GIF" image. Homepage will just display the first "frame"
of an animated image. Preview in your browser to see the
animation.
|
Internet Image
Resources
- I have compiled these two pages of graphical files and
resources. Each includes a large number of graphics, so
downloading time may be extended.
- Explore other webpages for public domain graphics. (I didn't
create these sites so I relinquish responsibility for what you may
find here!)
- Yahooligan's
Downloader: Kid appropriate pictures, browsable and
searchable.
http://www.yahooligans.com/Downloader/Pictures/
- Altavista
Image Finder
- Lycos Image
Finder Search for pictures or audio files.
http://multimedia.lycos.com/
- Icon Bazaar:
Organized collection of people, flowers, flags, banners,
cartoons, etc. (http://www.iconbazaar.com/)
- The Clip Art
Connection - Theme Specific Clip Art
(http://www.clipartconnection.com/)
- Microsoft
Image Gallery
(http://www.microsoft.com/gallery/files/images/default.htm)
- Pixelsight:
Hundreds of categorized images (requests you post a link back
to the site)
(http://www.pixelsight.com:80/PS/clipart/clipart.html)
- Akiko
Free Icons: Japanese firm distributing copyright-free icons
(http://www.roppongi.com/akikobrand/index.html)
- Animated
Gifs at Eric's Homepage
(http://www.geocities.com/SiliconValley/9974/animindex.html)
- Free
Art for HTML: 3-D letters, metal textures, and animations
(http://www.mcs.net/~wallach/freeart/buttons.html)
- 500,000
Free!! Cool Graphics: The "LARGEST Resource" on the Web?
(http://little.fishnet.net/~gini/cool/)
- Gilbert's
Icon Archive: Buttons, bullets, icons, animated graphics
(http://www.westworld.com/~ghyatt/icons/)
- The
Icon Depot
(http://www.geocities.com/SiliconValley/6603/)
- Bullets,
Cubes and Bars
(http://www2.firstsaga.com/chris/clipart/clipart.html)
- Indexes of graphic sites:
- WWW
Clip Art Sites
(http://mug.lerc.nasa.gov/MUG/ClipArt.html)
- Yahoo's lists of Webpage
Clipart and Animated
Images: Exhaustive and updated frequently!
(http://www.yahoo.com/Computers_and_Internet/Multimedia/Pictures/Clip_Art/
and
http://www.yahoo.com/Computers_and_Internet/Graphics/Computer_Animation/Animated_GIFs/)
- Try Searching
Lycos by selecting "picture" in the popup menu under
search, and entering the subject you want pictures of in the
data box. (http://lycos.cs.cmu.edu/)
Mediabuilder is an
outstanding resource site you don't want to miss!
(http://www.mediabuilder.com)

Image Alignment
Options
|
|
Claris Homepage
|
Netscape Composer
|
MS Frontpage 2000
|
- If an image is displayed by itself on a line, you can
use the Align Left, Align Center, and Align Right tools
(
 ) )
- If text will be displayed with an image, however, it
is best to Double click on the image in Claris HomePage:
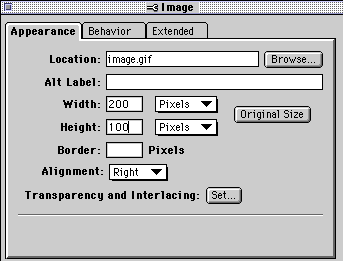
- Alternate
Labels: Type a title in the "Alt Label" blank
which will be displayed as the image loads in Netscape
browsers, or when the mouse passes over the image in
Explorer browsers.
- Alignment:
- Select the Alignment option desired from the
pop-up menu.
- These options indicate where text will be
displayed relative to the image (top, middle, bottom)
or where the image will be displayed on the page
(left, right).
- Select left or right if you want text to "wrap"
around an image. The image to the right is displayed
with "Right" alignment.
- Borders:
Eliminate the blue border which shows up around a linked
image (like this
 )
by setting a border width of 0 pixels (zero). )
by setting a border width of 0 pixels (zero).
- Transparency and
Interlacing: By clicking on this button, you
can specify ONE color of an image which will be
transparent (see through). You can also interlace images
from the same window, which makes images load by
gradually with increasing resolution.
- Height and Width:
Changing these values will change the size of
the image displayed on the page, but will not change the
actual image dimensions (or file size).
- Change numbers proportionally to avoid distorting
the image.
- Consider using an image editing program to reduce
the image size. This will make the file smaller and it
will load faster.
- Remember that resolution is lost when image size
is increased. Scan at a higher dpi setting for greater
resolution.
|
|
- If an image is displayed by itself on a line, you can
use the Align Left, Align Center, and Align Right tools
(
 ) )
- If text will be displayed with an image, right click
an image and choose PICTURE PROPERTIES.
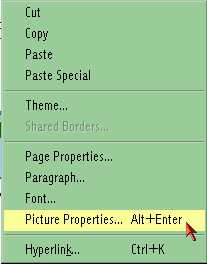
- Alternate
Labels: Type a title
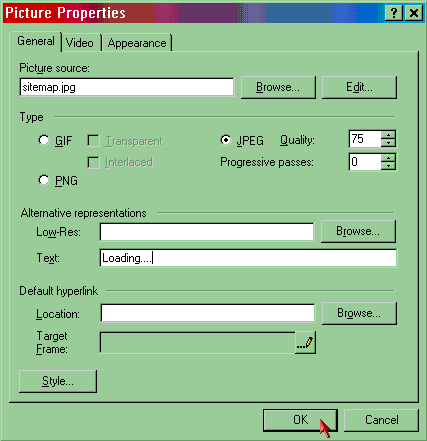
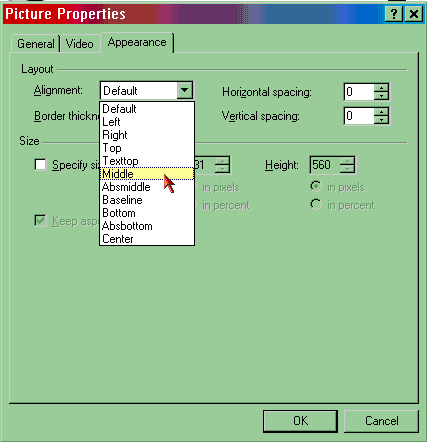
- Alignment:
Click the APPEARANCE tab at the top and choose
the desired alignment of the text relative to the image:
- Borders:
Eliminate the blue border which shows up around a linked
image (like this
 )
by keeping the default border width of 0 pixels
(zero). )
by keeping the default border width of 0 pixels
(zero).
- Height and Width:
Changing these values will change the size of
the image displayed on the page, but will not change the
actual image dimensions (or file size).
- Frontpage will let you specify percentages or
pixel sizes.
- Change numbers proportionally to avoid distorting
the image.
- Consider using an image editing program to reduce
the image size. This will make the file smaller and it
will load faster.
- Remember that resolution is lost when image size
is increased. Scan at a higher dpi setting for greater
resolution.
|
- Creating graphics for your
webpage: An option to finding graphics on the internet
or CD ROMs is creating them yourself.
- You can use "Paint" documents in ClarisWorks as well as
HyperStudio to create and manipulate graphics files.
- Use graphics to organize and unify your school webpage
- Create a primary school banner, and a smaller version to
use as a "return icon" to return visitors to the main
page
- Create a graphic for each subcategory of your webpage,
and use them in the same way.
- Most webpage images are "gif" files. If you create a
graphic in PICT format, you will need to convert it to GIF
format before including it on a webpage.
Helpful software includes:
- MAC/WINDOWS: Adobe
Photoshop is the premier image editing program available
today. Educational discounts are available
(http://www.adobe.com/prodindex/photoshop/main.html)
- MAC: "GraphicConverter"
is an excellent shareware utility designed for this purpose.
(http://www.lemkesoft.de/us_gcabout.html)
- WINDOWS: PaintShop
Pro is a highly-touted PC graphic program.
(http://www.jasc.com/psp.html)
- Remember to keep image sizes small (< 40K) to minimize
download time for visitors.
Make an Image a
Link: Just like text, an image can serve as a "link" to
another webpage:
- Click once on the image.
- Follow the steps to insert an absolute
link or a relative
link.
Type in the complete internet address of the resource you want to
link to, or click on the "Browse Files..." button to create "relative
links" to other pages you've created.
Inserting Images from the
Claris HomePage Library
- Before searching the internet for graphical images or using
CD-ROMs, use the resources included with Claris Homepage!
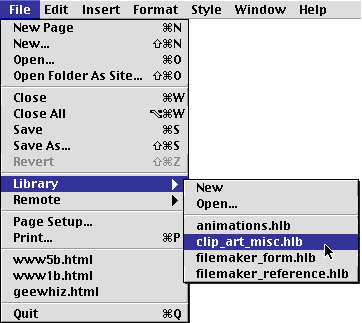
- From the File menu, select Library and then
Clip_art_misc.hlb. Your menu selection will look like
this:
- Select the category you want. In this example,
arrows_blue is selected:
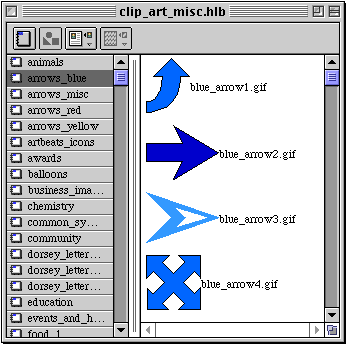
- Click on the image you want to put on your webpage and hold
down the mouse button (left button for Windows users). Drag the
image to your open Claris HomePage file and release the
mouse.
- Like text, you can use the alignment buttons (
 )
to move images to the left, center, or right side of a webpage.
Other options (including text wrap) will be
explained after the next section about
acquiring images from the internet.
- You can add "animated GIFs," which are animated images like
the one below, from the Claris HomePage library in the exact same
way. Instead of choosing the Clip_art_misc.hlb library,
choose animations.hlb.

 -
- 
Home - Basic
Course - Intermediate
Course - Tools for the
TEKS

 Course
and Website by Wesley A.
Fryer of Lubbock, Texas.
Site sponsored by WesTech Vision
Inc.

![]()

![]()
 Re
Re


 Course
and Website by Wesley A.
Fryer of Lubbock, Texas.